
Whether you went for the 12ft Fun Bouncer or the 14ft Trampoline with enclosure, this guide will walk you through how to get the party started and keep it going all day long. These commercial grade inflatables are built tough for hours of high-energy bouncing, but to get the most out of your trampoline and keep everyone safe, it’s important to set it up properly and establish some ground rules.
Don’t worry, we’ve got you covered. In just a few minutes you’ll learn about these trampolines. Let’s get started!
Assembling the Frame and Bed
To get started, lay out all the frame parts and the trampoline bed on your lawn. Make sure you have the four leg bases, eight leg extensions, four top rails with stubs, four top rails without stubs, the bed, and 80 (for the 12ft) or 96 (for the 14ft) springs.
Begin by attaching two leg extensions to each leg base. Next, connect two leg assemblies together with a top rail that has stubs. Do the same on the opposite side. Then connect those two sides with a top rail without stubs.
Keep alternating and connecting top rails with and without stubs between the leg assemblies until the frame is complete.
For the bed, find the springs that have an elongated hook on one end and a standard hook on the other. Attach the elongated hook end to the frame and the standard hook to the holes along the edge of the trampoline bed, making sure the bed logo faces up. Connect one spring next to each of the T-shaped joiners around the frame.
This should leave the bed suspended about 8 springs. Make sure there is little tension before continuing.
Attaching the Safety Enclosure
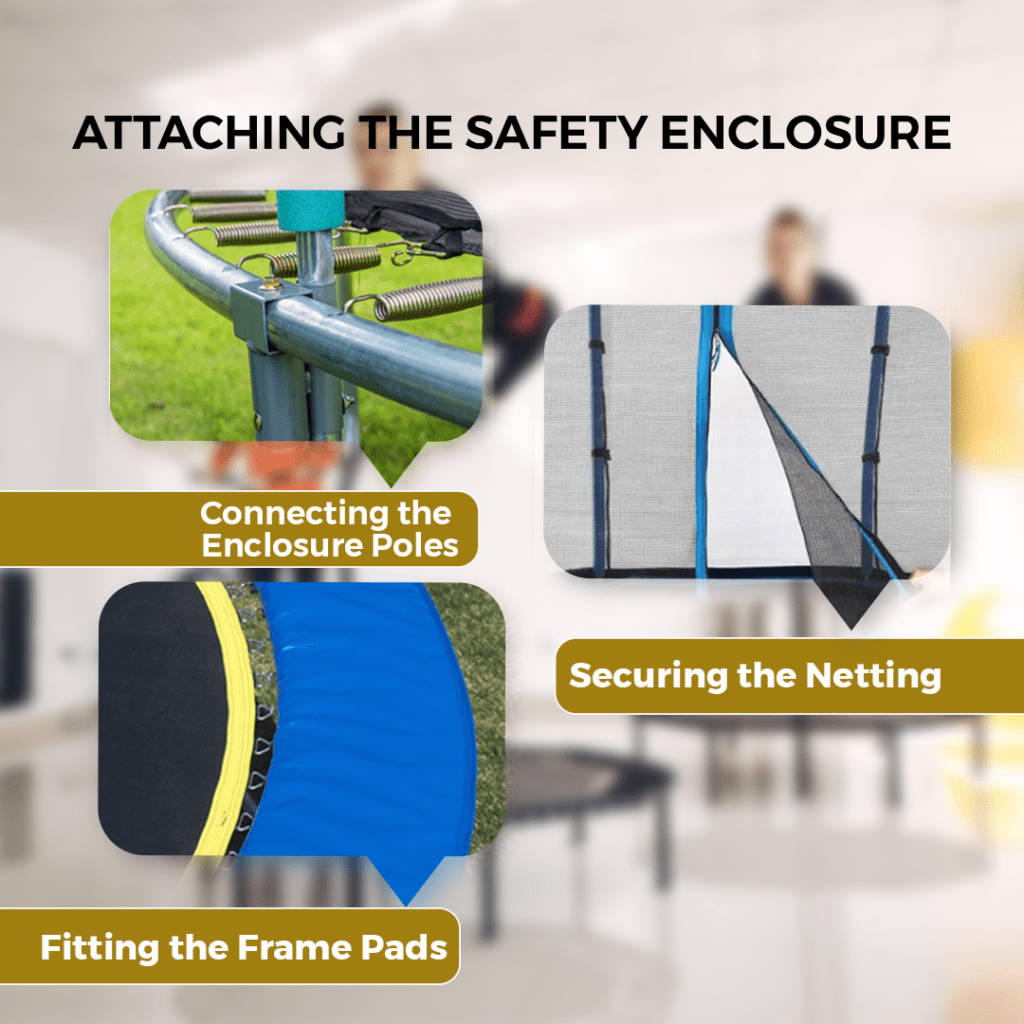
Attaching the safety enclosure is crucial for keeping jumpers contained and avoiding injuries. To get set up, you’ll need the enclosure netting, bungee cords with Q-hooks, and the top poles that form the upper border.
Connecting the Enclosure Poles
Lay out the netting over the trampoline mat and locate the middle seam. Attach eight bungee loops with Q-hooks to the clips on the net, then secure the other end of the bungees to the eyebolts in the middle of the enclosure poles. Make sure the net isn’t twisted. The bottom of the net should line up with the triangular anchor points on the mat.
Securing the Netting
Find the small slots along the bottom edge of the netting – there’s one for each steel triangle on the mat. Match up each slot and triangle before attaching the net.
Remove one of the eight springs from the frame and feed the corresponding steel triangle through the slot in the net. Reattach the spring to secure the net in place. Work your way around the trampoline, removing each spring in turn and reattaching it through the net slot and steel triangle.
Double check that the net is securely fastened all the way around, with no loose edges, before allowing anyone to jump. For safety, the net should be tight enough not to sag but not pulled taut, as this can damage the netting and anchorage system.
With the enclosure set up properly, you can feel confident allowing kids and novice bouncers on the trampoline while avoiding the risk of falls or collisions. Regularly inspect the net for any damage or loose edges and replace if needed. By following the installation steps carefully and making safety a priority, your trampoline can provide hours of fun for the whole family.
Fitting the Frame Pads with 14ft Trampoline
Now that your frame is assembled, it’s time to add the protective padding. The frame pads help prevent scrapes and bruises from the springs and frame, so fitting them properly is important for safety.
To start, you’ll need to disconnect the enclosure net from the bungee loops in the middle of the poles. Have a screwdriver handy to help feed the loops through the eyelets if needed.
Lay out the frame pads upside down on the trampoline bed. Thread the toggle loops through the eyelets, then flip the pads over and position them over the frame. Make sure one full panel of padding is in front of the enclosure entrance so the stitching isn’t weakened. Fasten the toggle loops around the frame to secure the pads in place.
With the frame pads fitted, you can now reattach the enclosure net. Connect the top pole to the corresponding bottom pole on the trampoline. Use the 16 bungee loops to attach the netting to the poles, starting at the middle points. Remove your shoes and enter the enclosure to finish attaching the top loops. Double check that all 16 loops are securely fastened and you’re ready to start bouncing!
The frame pads help create a safer jumping experience, so take care to fit them properly according to the instructions. Regularly inspect the pads for damage or tears and replace them if needed. With the frame pads and enclosure net in place, your bouncer is ready for action. Happy bouncing!
Using the Ladder Safely
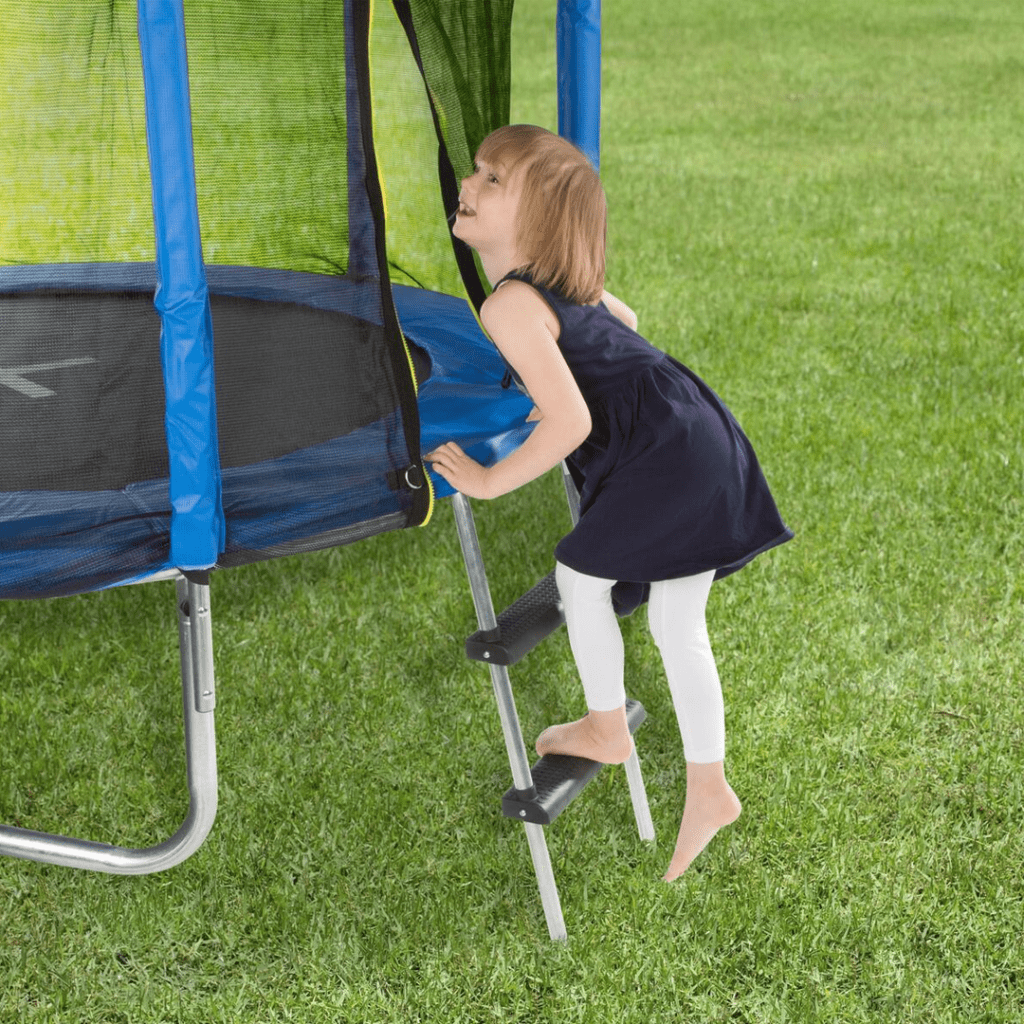
Using the ladder to get on and off your trampoline safely is extremely important. The ladder provides a stable way to climb up onto the jumping mat without risking injury. However, there are a few key things to keep in mind when using the ladder:
Always face the ladder when climbing up or down. Never climb up or down the ladder facing away from the trampoline. This can lead to slips and falls.
Grip the top rung of the ladder firmly before stepping onto the jumping mat. Make sure you have your balance before letting go of the ladder. The mat can be springy and unstable until you find your footing.
Use a ladder that is the proper height for your specific trampoline model. A ladder that is too short or too tall can be difficult to climb and increases the chance of losing your grip or balance. Refer to the specifications for your trampoline to determine the recommended ladder height.
Ensure the ladder is securely hooked over the top ring of the trampoline before climbing up or down. The ladder should fit snugly over the top ring, not slide or wobble. If it’s not secure, it can detach from the trampoline, causing falls.
Consider using a ladder with rubber protectors on the bottom to prevent slipping. Rubber protectors provide extra grip and stability for the ladder, especially on dewy grass or uneven ground.
Remove the ladder from the trampoline when not in use and properly store it. An unattended ladder can be a hazard and provide unwanted access to the trampoline. Store the ladder in a shed or garage when trampolining is complete.
Following these tips for using the ladder properly and safely will help ensure you and anyone else climbing onto your trampoline avoids injury and has maximum fun while jumping! Take the time to show others the proper way to use the ladder before letting them on the trampoline. Safe trampolining for all starts at the base of the ladder.
Bouncing Safely in the Centre
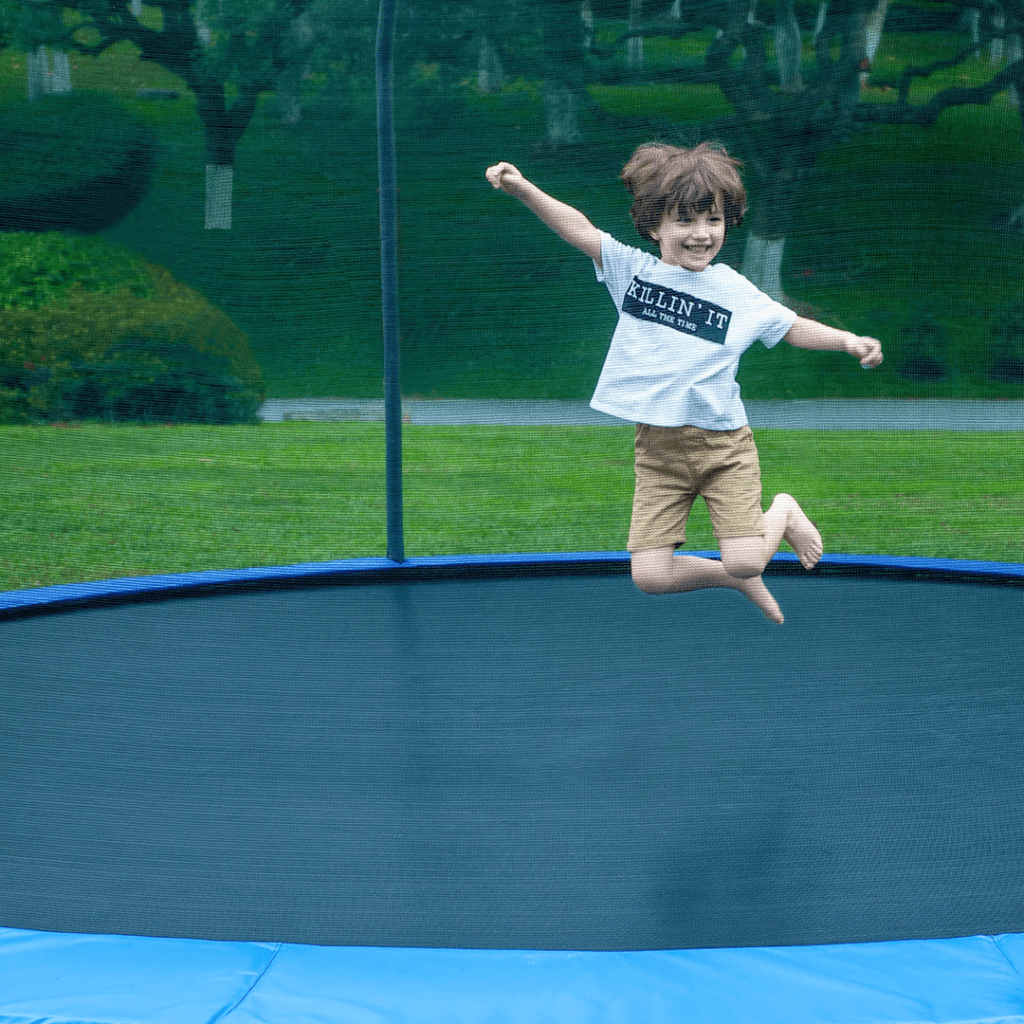
Once you’ve set up your bouncer, it’s time to start bouncing! For the most fun and to avoid injury, there are a few guidelines to keep in mind.
Stay in the Centre
Always aim to bounce in the middle of the trampoline bed. The springs are most responsive here, giving you the best lift and the safest area to land. Bouncing too close to the edge can put strain on the springs and frame, and increases the risk of falling off.
Control Your Bounce
Start with some simple bounces to get a feel for it before trying any fancy moves. Bend your knees when you land to absorb the impact. Keep your eyes fixed on the trampoline bed in front of you for the best control and balance. Only go as high as you feel in control – you can always build up height over time as you get more comfortable.
Learn the Basics
Once you’ve mastered the simple bounce, you can start learning some basic moves before moving on to somersaults or other aerial tricks. Seat drops, knee drops, and front drops are all easy to pick up and fun to do. For the seat drop, land on your bottom with bent knees and then bounce back up. The knee drop is the same but landing on one or both knees. The front drop involves landing on your front in a push-up position and then pushing back up.
Safety First
There are a few important safety tips to keep in mind to avoid injury:
• Only one person bouncing at a time. No double bouncing.
• Remove shoes, jewellery and any sharp objects before bouncing.
• Do not bounce under the influence of drugs or alcohol.
• Be very careful in wet or icy conditions as the trampoline can get slippery.
• Do not let anyone bounce underneath the trampoline.
• Somersaults should only be attempted by trained individuals.
By following these guidelines, you’ll be bouncing safely and having a blast in no time. But remember, always put safety first and don’t do anything beyond your skill level.
Conclusion
Whether you opt for the 12ft Fun Bouncer or go big with the 14ft Trampoline, follow the instructions, take safety precautions and most of all, have fun! Bounce away without a care, do some epic slam dunks, try out your best ninja moves or just lazily lounge and bounce. Once the laughter and squeals of delight start, you’ll know you made the right choice. Now get out there, stake your claim on a patch of grass and make some memories to last long after the bouncy castle has been deflated and packed away.
The setup time can vary, but on average, it takes approximately 1 to 2 hours to assemble the frame, bed, and safety enclosure. Following the step-by-step instructions provided in the user guide will ensure a smooth setup process.
Regularly inspect the bouncer for any signs of wear, tears, or damage. Clean the trampoline bed and enclosure net with a mild detergent and water solution. Ensure all connections are secure. Store the bouncer in a dry place when not in use to prolong its lifespan.
While the bouncer is designed for outdoor use, it’s recommended to take it down and store it in a dry place when not in use for an extended period. This helps protect the material from weather elements and ensures longevity.
Yes, always face the ladder when climbing up or down. Ensure the ladder is securely hooked over the top ring of the trampoline before use. Choose a ladder of the appropriate height for your trampoline model. Additionally, remove the ladder and store it properly when not in use to prevent unauthorized access and accidents.
The ladder has a specified weight limit, typically mentioned in the user guide. Avoid exceeding this weight limit and never allow multiple users to climb the ladder simultaneously. Ensure that each user climbs the ladder individually, following safety precautions, to prevent accidents and ensure stability.